How to Set Up a Freshwater Aquarium Beginner Guide
Setting up a freshwater aquarium can feel confusing at first, but once you follow the right steps, it becomes much easier. Most beginner problems don’t come from lack of effort they come from doing things in the wrong order.
I’ve rushed setups before, skipped steps like rinsing substrate or cycling, and ended up dealing with cloudy water and stressed fish.
This guide walks you through the full process from start to finish, exactly as shown in the steps above. If you take your time and follow each step properly, your tank will stay stable, clear, and much easier to maintain.
Step 1: Plan and Prepare
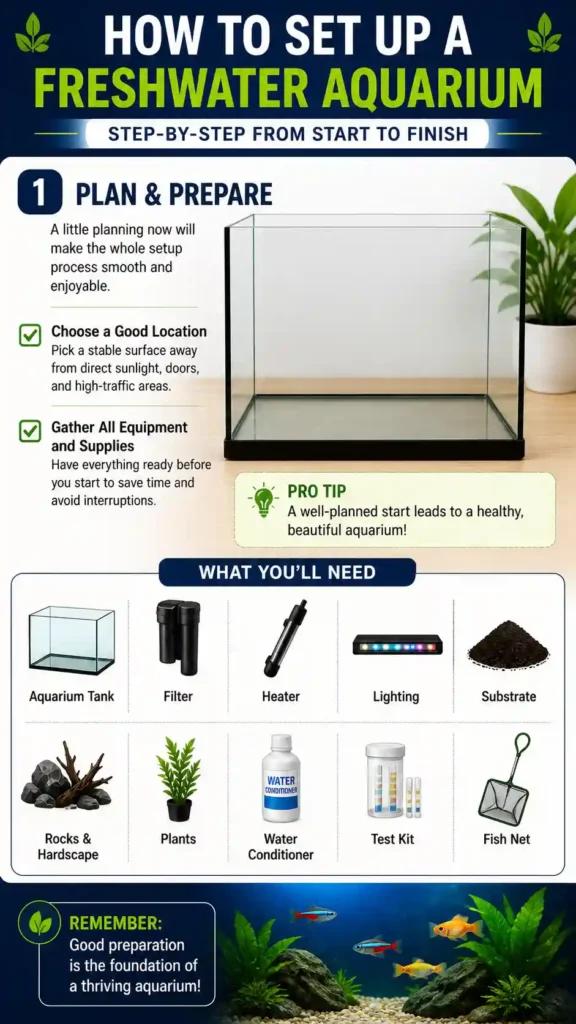
Before you add anything to your aquarium, take a few minutes to plan your setup. This step might feel basic, but it prevents most beginner mistakes. I’ve placed a tank near a window before thinking it would look great, but it quickly led to algae problems and temperature swings. Once the tank is filled, moving it becomes difficult, so getting the location and setup right from the start really matters.
What to do first:
- Place the tank on a strong, flat surface
- Keep it away from direct sunlight
- Avoid busy areas where the tank can be bumped
- Make sure a power outlet is nearby
Get everything ready before starting:
- Aquarium tank, filter, heater, and light
- Substrate, rocks or driftwood, and plants
- Water conditioner and test kit
- Basic tools like a fish net and bucket
Focus on these essentials:
- Filter keeps water clean and supports bacteria
- Water conditioner makes tap water safe
- Test kit helps you know when the tank is ready
Taking a little time here makes the rest of the setup much smoother and avoids problems later.
Step 2: Rinse the Substrate
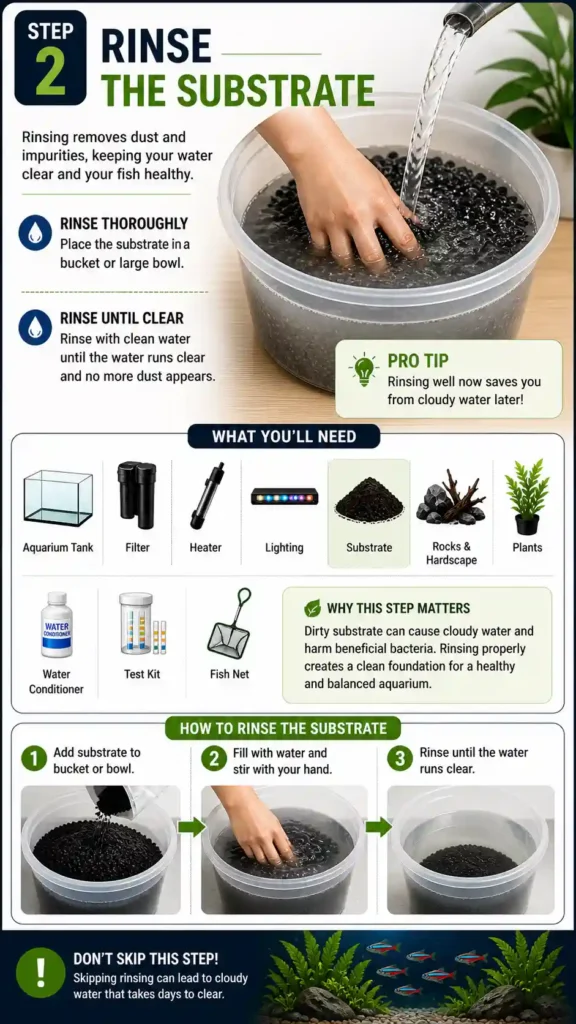
Before adding substrate to your tank, you need to rinse it properly. This step is often skipped, but it makes a big difference. The first time I didn’t rinse gravel, my tank turned cloudy within minutes and stayed that way for days. It didn’t harm the fish directly, but it made the setup frustrating and messy. Rinsing removes dust and fine particles, giving you clear water from the start.
How to rinse substrate:
- Add substrate to a bucket or large bowl
- Fill with clean water
- Stir it with your hand to release dust
- Pour out the dirty water
- Repeat until the water looks mostly clear
Why this step matters:
- Prevents cloudy water after setup
- Keeps your tank looking clean from day one
- Helps avoid buildup of unwanted particles
Simple tip from experience:
- Don’t rush this—2–3 rinses are usually not enough
- Keep going until the water is no longer milky
Taking a few extra minutes here saves you from dealing with cloudy water later.
Read also: CO2 for Planted Aquariums: Beginner Guide
Step 3: Add the Substrate
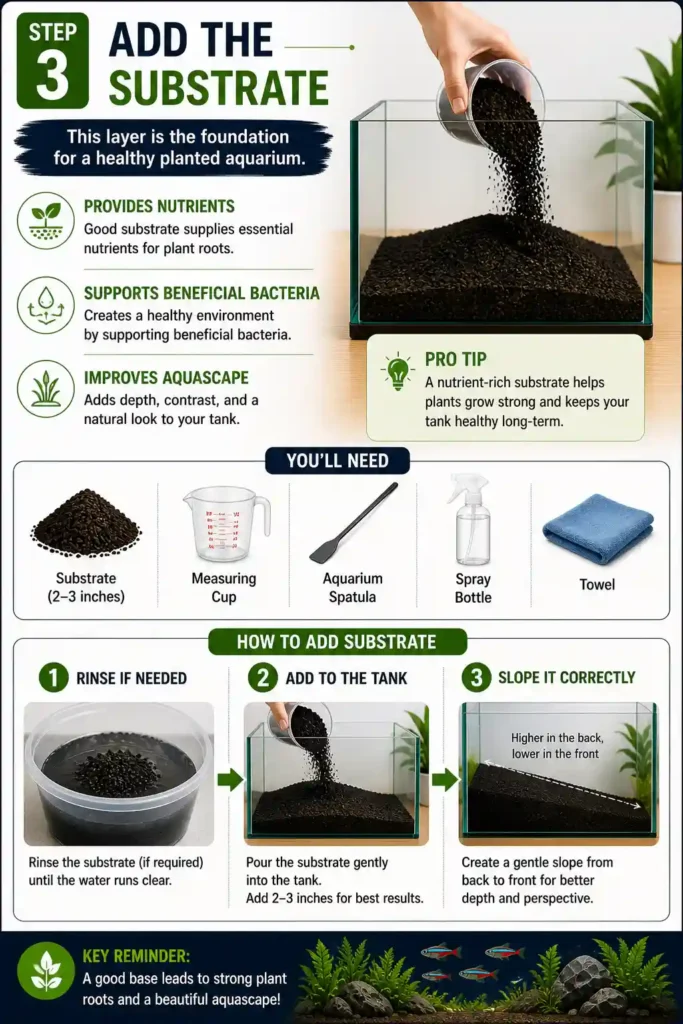
Now it’s time to add substrate to your tank. This layer is more important than it looks because it supports plant growth and helps beneficial bacteria settle in. The first time I added substrate, I spread it flat without thinking much about it. Later, I realized the tank looked unnatural and plants didn’t root as well. A small change in how you place it makes a big difference.
How to add substrate:
- Pour the substrate gently into the tank
- Add about 2–3 inches for most setups
- Spread it evenly across the base
- Avoid dumping it too fast to keep layout clean
Shape it properly:
- Keep the back slightly higher
- Keep the front slightly lower
- Create a gentle slope for better depth
Why this step matters:
- Supports plant roots and growth
- Helps beneficial bacteria develop
- Improves the overall look of your tank
Simple tip from experience:
- Don’t leave it flat—the slope makes your tank look more natural
- Take a minute to adjust before moving to the next step
A good substrate setup makes everything that comes after easier and better looking.
Step 4: Add Hardscape
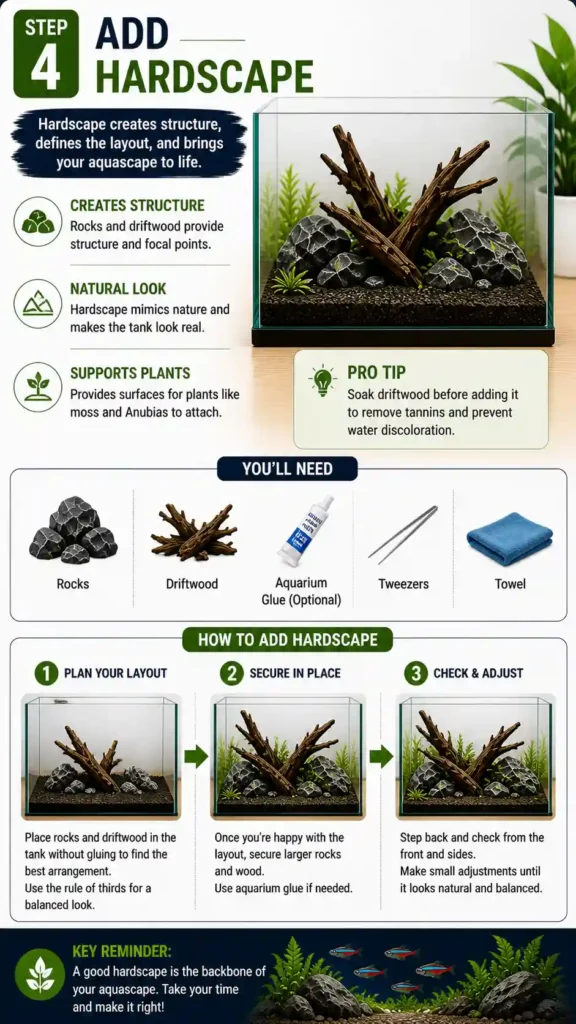
Now you start shaping how your aquarium will actually look. Hardscape means rocks and driftwood, and this step gives your tank structure. The first time I added everything quickly, it looked messy and unbalanced. When I slowed down and tried different placements, the tank instantly looked more natural. This is one step where taking a few extra minutes really pays off.
How to add hardscape:
- Place rocks and driftwood directly on the substrate
- Try different positions before fixing anything
- Don’t rush—move pieces around until it feels right
Set the layout properly:
- Avoid placing everything in the center
- Use uneven placement for a natural look
- Keep larger pieces as focal points
Why this step matters:
- Creates structure and depth
- Makes the tank look natural, not artificial
- Gives plants and fish places to settle
Simple tip from experience:
- Step back and look from different angles
- If it looks too perfect or symmetrical, adjust it
Getting the hardscape right makes the rest of the setup much easier and better looking.
Step 5: Plant Your Aquarium
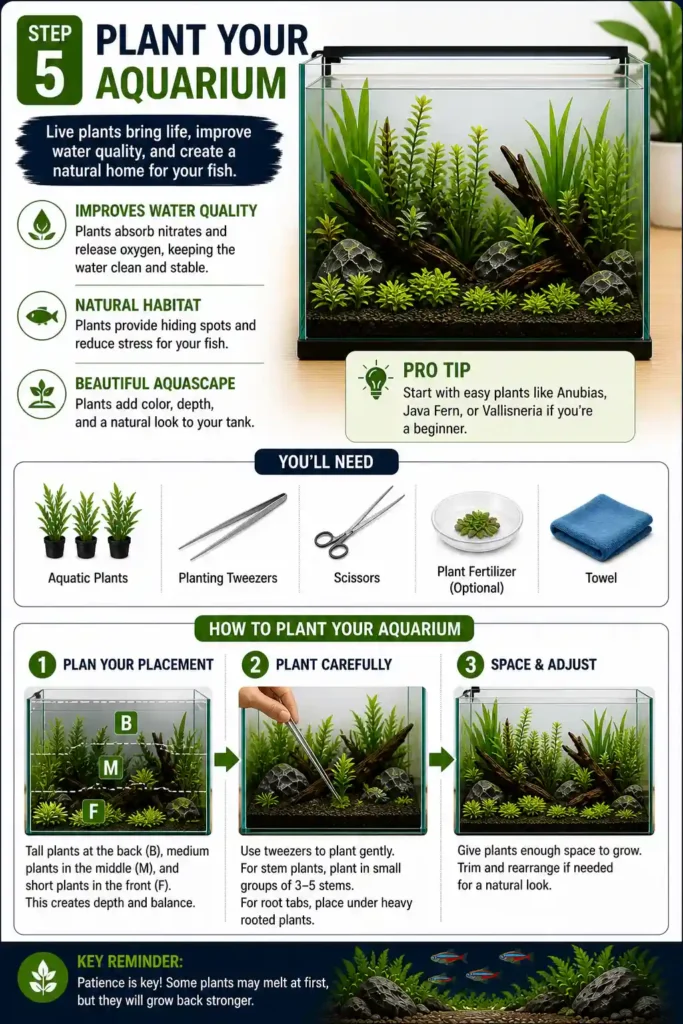
This is the step where your tank starts to feel alive. Adding plants not only improves how your aquarium looks, but also helps keep the water stable. When I first started, I didn’t think plants were necessary, but after adding them, I noticed clearer water and healthier fish. Even simple plants can make a big difference.
How to place your plants:
- Put tall plants at the back
- Use medium plants in the middle
- Place small plants in the front
- Leave some open space for swimming
How to plant properly:
- Use tweezers to place plants gently
- Plant stem plants in small groups
- Keep roots covered but not buried too deep
Why this step matters:
- Helps improve water quality
- Gives fish hiding spots
- Makes your tank look natural and balanced
Simple tip from experience:
- Start with easy plants like Anubias or Java Fern
- Don’t worry if some leaves melt at first—it’s normal
Taking your time here makes your aquarium look better and easier to maintain. for more advance setup learn about aquascaping guide
More plant you can used:-
- 10 Best Foreground Aquarium Plants
- 10 Best Low Light Aquarium Plants for Beginners
- 12 Fast Growing Aquatic Plants
Step 6: Fill Water and Add Conditioner
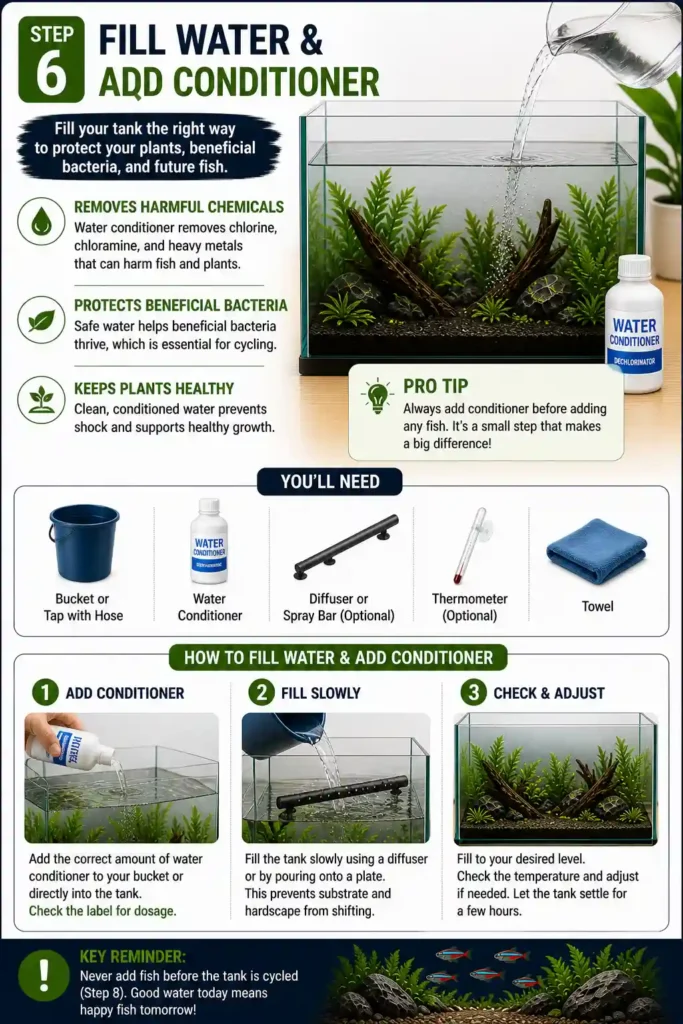
Now you can fill your tank with water, but this step needs a little care. The first time I filled a tank, I poured water too fast and ended up disturbing the substrate and ruining the layout I had just set. Filling slowly makes a big difference. Also, tap water is not safe for fish right away, so adding conditioner is not optional—it’s essential.
How to fill the tank:
- Add water slowly using a cup or bucket
- Pour onto a plate or surface to avoid disturbing substrate
- Fill to your desired water level
Add water conditioner:
- Add the correct amount based on the label
- Mix it into the tank or bucket water
- Make sure all water is treated before fish are added
Why this step matters:
- Removes chlorine and harmful chemicals
- Protects beneficial bacteria
- Prevents stress for plants and future fish
Simple tip from experience:
- Always add conditioner before thinking about fish
- Let the tank settle for a few hours before moving to the next step
Taking your time here keeps your tank stable and prevents problems later.
Step 7: Set Up Your Equipment
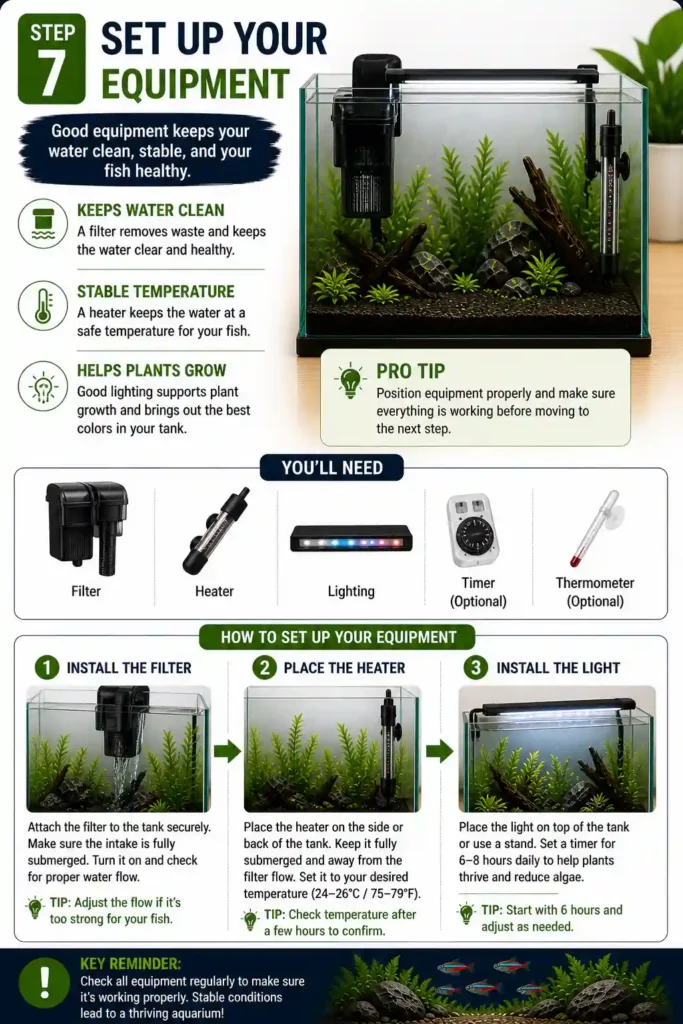
Now your aquarium starts working like a real system. This step is what keeps your water clean and stable. The first time I set up a tank, I didn’t pay much attention to how the filter and heater were placed, and it led to uneven water flow and temperature issues. Once everything is set up properly, your tank becomes much easier to manage.
How to set up your equipment:
- Install the filter securely on the tank
- Make sure the intake is fully submerged
- Place the heater on the side or back of the tank
- Keep the heater fully underwater
- Add the light on top of the tank
Set it correctly:
- Adjust heater to around 24–26°C (75–79°F)
- Keep the filter running continuously
- Set lighting for about 6–8 hours daily
Why this step matters:
- Filter keeps water clean and moving
- Heater keeps temperature stable
- Light supports plant growth
Simple tip from experience:
- Turn everything on and check before moving ahead
- If the filter flow is too strong, adjust it early
Once your equipment is running properly, your tank is ready for the most important step next.
Step 8: Cycle Your Aquarium
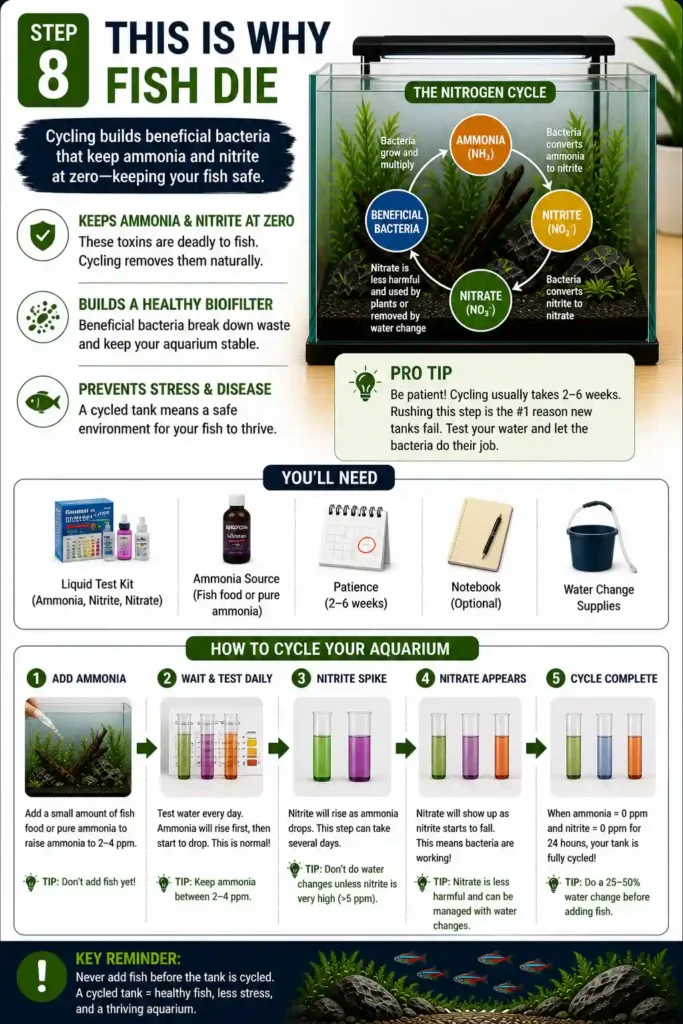
This is the most important step, and it’s the reason many beginner tanks fail. The first time I skipped cycling, the water looked clear, so I added fish early. Within a few days, they became stressed and didn’t survive. The problem wasn’t visible it was the water chemistry. Cycling builds beneficial bacteria that remove harmful toxins, making your tank safe.
How cycling works:
- Fish waste or food creates ammonia
- Bacteria convert ammonia into nitrite
- More bacteria convert nitrite into nitrate
- Nitrate is safer and controlled with water changes
How to cycle your tank:
- Add a small source of ammonia (fish food or pure ammonia)
- Test water regularly using a test kit
- Wait as ammonia rises, then starts to drop
- Watch nitrite spike and then fall
- Tank is ready when ammonia = 0 and nitrite = 0
Why this step matters:
- Removes toxic ammonia and nitrite
- Builds beneficial bacteria naturally
- Creates a stable and safe environment
Simple tip from experience:
- Don’t add fish during this stage
- Be patient—it usually takes 2–4 weeks
This step decides whether your fish survive or not, so don’t rush it.
Step 9: Final Check Before Adding Fish
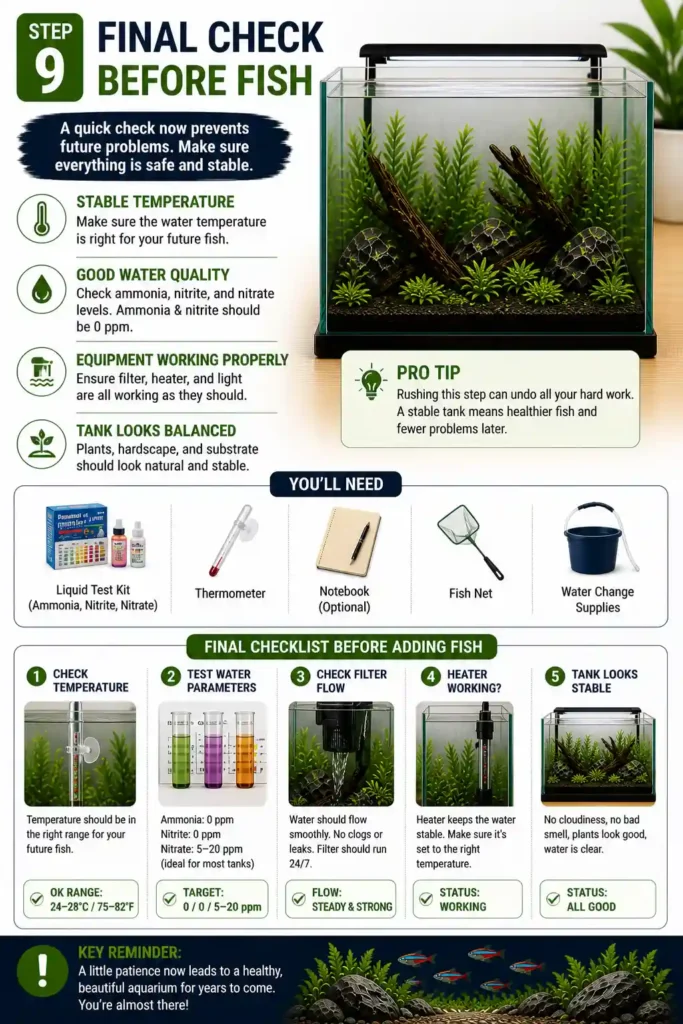
Before adding fish, take a moment to check everything. This step is where you confirm your tank is actually ready. I’ve rushed this before because the water looked clear, but later found out the parameters weren’t stable yet. A quick check here can prevent losing fish after all the work you’ve done.
What to check first:
- Make sure the temperature is stable
- Check that water is clear and settled
- Look over the overall tank setup
Test your water:
- Ammonia should be 0 ppm
- Nitrite should be 0 ppm
- Nitrate should be low (around 5–20 ppm)
Check your equipment:
- Filter is running smoothly
- Heater is working and set correctly
- Light is functioning properly
Simple tip from experience:
- If something feels off, wait another day or two
- Don’t rely on clear water alone—always test
Taking a few minutes here makes sure your tank is truly ready and safe for fish.
Step 10: Add Fish the Right Way
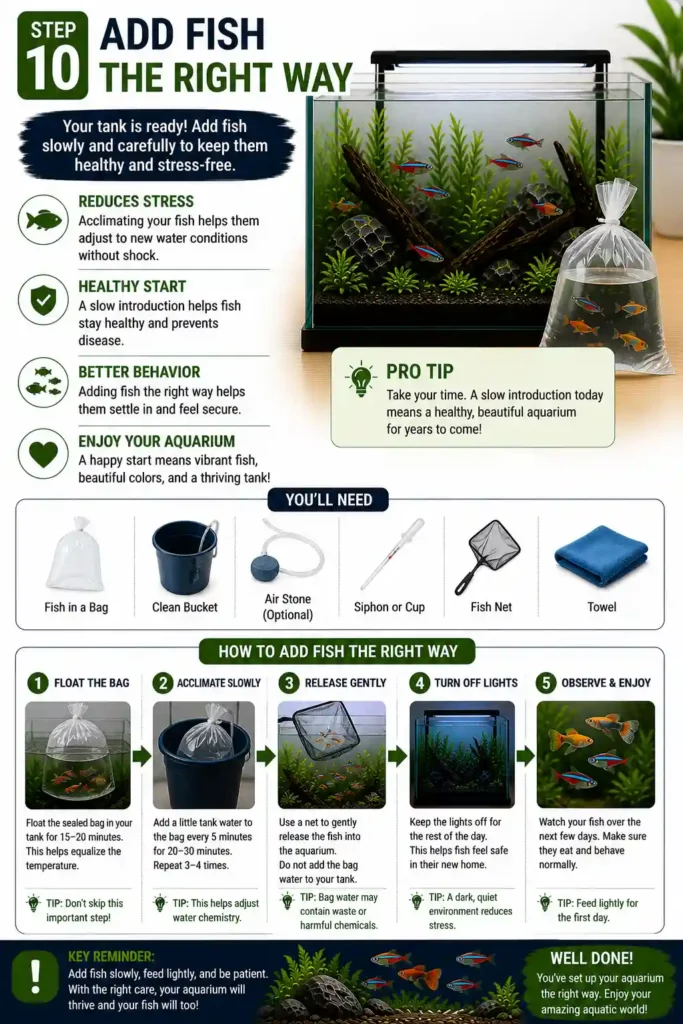
Your tank is finally ready, but this last step still needs patience. The first time I added fish, I skipped acclimation and put them straight into the tank. They looked fine at first, but later showed stress. Fish need time to adjust to new water conditions, so adding them slowly makes a big difference in how well they settle.
How to add fish properly:
- Float the sealed bag in the tank for 15–20 minutes
- Add small amounts of tank water into the bag
- Repeat for about 20–30 minutes
- Gently release fish into the tank using a net
After adding fish:
- Keep the lights off for the rest of the day
- Avoid feeding too much on the first day
- Watch how fish behave over the next few days
Why this step matters:
- Reduces stress from sudden changes
- Helps fish adjust safely
- Prevents early losses
Simple tip from experience:
- Don’t add too many fish at once
- Take it slow adding gradually keeps the tank stable
Adding fish the right way ensures your aquarium starts healthy and stays that way.
Learn more about Freshwater fish guide
FAQs
How long should I wait before adding fish?
You should wait until the tank is fully cycled. This usually takes around 2–4 weeks. Adding fish too early is one of the most common mistakes.
Why is my aquarium water cloudy after setup?
Cloudy water usually happens when substrate isn’t rinsed properly or the tank is still settling. It often clears on its own after a few days.
Do I really need a water conditioner?
Yes, it’s essential. Tap water contains chlorine and chemicals that can harm fish and beneficial bacteria.
Can I skip the cycling step?
No, this is the most important step. Cycling builds beneficial bacteria that remove harmful toxins. Skipping it often leads to fish loss.
How many fish should I add at the beginning?
Start with a small number of fish and increase gradually. Adding too many at once can cause water quality problems.
Do I need live plants in my aquarium?
They are not required, but they help improve water quality and make the tank more stable. Even a few easy plants can make a big difference.
What temperature should my tank be?
For most tropical fish, keep the temperature between 24–26°C (75–79°F). Always check based on the fish you plan to keep.